Pin It Now!
Good Afternoon All!!
Lets talk about Projects today, how many do you have? I have been making lists of ones I have started, want to start and have the stuff for and want to start and don't have anything for. Let me say that it is quite a LARGE list haha!!
I find I am very easily suckered into projects :P I just love so many different styles and there are a ton of things I want to do. Does this happen with everyone else? One of the girls at my quilting group said a friend of hers did a list of WIP and she had 73!!!!! That is not a typo. I am not near that number yet but just going through and seeing what I have on my list is a little intimidating I must admit.
Here are my numbers!
14 WIP's- these range from big to small and I will be adding Christmas gifts on here as well plus some small
crocheted gifts
5 Projects to Quilt- these are all small except for one double size quilt top
14 Projects on my "To Start" List- These are projects I have kind of started in the respect that I have either the fabrics already, it was a kit I bought, I already have plans for if it is going to someone, or a place to put it. And of course it also includes the ones I am dying to make and keep such as dresden plate and cathedral windows.
So how about you guys? What are your numbers?
I would love to know! So leave a comment and we can see who has the most haha!
So onto updates!
I have decided not to give Farmers Market to my inlaws for christmas this year at least. I am not super happy with the quilt in general at the moment and don't want to keep going with it as a Christmas gift and decide I hate it and then have nothing to give. So I am going to keep going but need to decide how I want to change it. SO I needed a new gift idea and stumbled upon the free patterns from Red Brolly whom I love. They had three Christmas sampler stitching designs that I am going to make into a wall hanging and I am much happier about giving it as a gift :)
Here is what I got accomplished last night when I decided to do it:
(sorry about the lighting)
Here is the link to the patterns if you wish do complete them as well.
http://www.red-brolly.com/red-brolly/free-red-brolly-patterns.html
Red Brolly also has an amazing and gorgeous free quilt pattern for Christmas right now called the Wish Quilt. Bronwyn is releasing the next part every couple of days and they are so cute!! Here is a link to the first pattern and the layout plus lots of pretty pictures of the quilt so you can see what you are getting into!!
http://www.red-brolly.com/red-brolly/2012/07/here-it-is-the-wish-quilt-part-one.html
Hexagons!
I have been getting lots of stitching done on my Japanese Flower Garden as well 1 big flower is finished completely which brings my total of big flowers to 7 out of 25 with #8 being worked on as below. I also have 2 small flowers completed and 3 more basted as seen below! Progress is coming along slowly but surely.
Hope you are having a fantastic day!!!
Kallie
Showing posts with label Christmas. Show all posts
Friday, 17 August 2012
Sunday, 5 August 2012
Christmas Napkins Tutorial
Pin It Now!
Well I am a bit slow on getting this posted but there is still plenty of time before Christmas! So flip through the tutorial and definitely try it yourself! They are very easy to whip up over the weekend and make great gifts. Also check out the bottom of the post on how to enter the My Memories Digital Scrapbooking Software giveaway!
Makes 6 Napkins
Materials:
1.5 meter front fabric
1.5 meter coordinating backing fabric
Matching thread for handsewing the opening and stitching the napkin
Contrasting thread for the "garland" detail or ric-rac/ribbon etc which ever you choose.
Template- Christmas Napkin Template
Template:
To make the template click on the link above and print 4 copies. Tape together. As stated on the template ignore the dips in the corners where the templates meet. You will be making a semi circle with you template.
Cutting
Using your template and your first fabric either trace around your template (remember to NOT trace the dips, just make a smooth semi-circle) and then cut the semi circle or just cut around. Whichever way you prefer. You will be cutting 6 semi circles.
Do the same thing with your second fabric.
***** If you have a directional print make sure to cut your semi circles with the flat bottom to the top. If you have your directional prints cut with the "tops" of say a bird pointing to the circular part f the napkin they will be upside down when folded.********
Sewing:
Now that you have 6 of each fabric cut out take one of each and layer them right sides together. Start sewing with your matching thread about 3-4 inches before the straight part ends and continue all the way around the curve and stop about 2" from your starting point. This leaves you an opening for turning right side out on the straight edge which makes it easy to sew closed later. Repeat 5 more times!
Clip the 2 corners and if you can trim your seam allowance on the curved edge just a bit. I didn't but its up to you :)
Turn right side out and poke out the corners into a nice point with a chop stick or something similar that won't go through your fabric. Start ironing your napkin making sure to push the seam out so you have a nice crisp edge. It will take a bit of fiddling so take your time and don't burn yourself!
Hand sew your opening closed with matching thread using your favourite stitch. Whip stitch works fairly well just try to take small stitches so that it is hard to see your thread.
Once you have all those stitched closed, (I promise it won't take a super long time! Just throw on a good show or cd and stitch away)we can start on the fun part!!
Sorry! No pictures here but pretty self explanatory!
Garland!
Thread your bobbin and machine with your contrasting thread. I used a gold coloured thread which matches my napkins since most of mine had gold accents in the fabric.
I set my machine to an astrik (*) stitch because it reminded me of snowflakes. Use whatever stitch you like on yours. Now you will be stitching ONLY THE CURVE! Do NOT stitch on the straight edge!!! It will look a little funny if you do. Take your time and you may need to stop and reposition slightly depending on your machine.
Once you get to the other end it worked best for me to chain sew the garland, so one I was at the other end of the curve I butted the next napkin (straight edge to straight edge and just kept sewing the garland. This way I was sure there was no threads being tangled at the back by stopping and starting again. Plus it make it quicker! Then just cut apart as you go. I might add a smidge of fray check to lock the stitching in place and prevent it from coming undone.
If you don't have decorative stitches on your machine don't despair!! Just find some coordinating ribbon or ric rac and sew it onto both sides of the napkins curve. Another option is something like bias tape on the curve. Just use your imaginations and you will find something to use :)
Folding
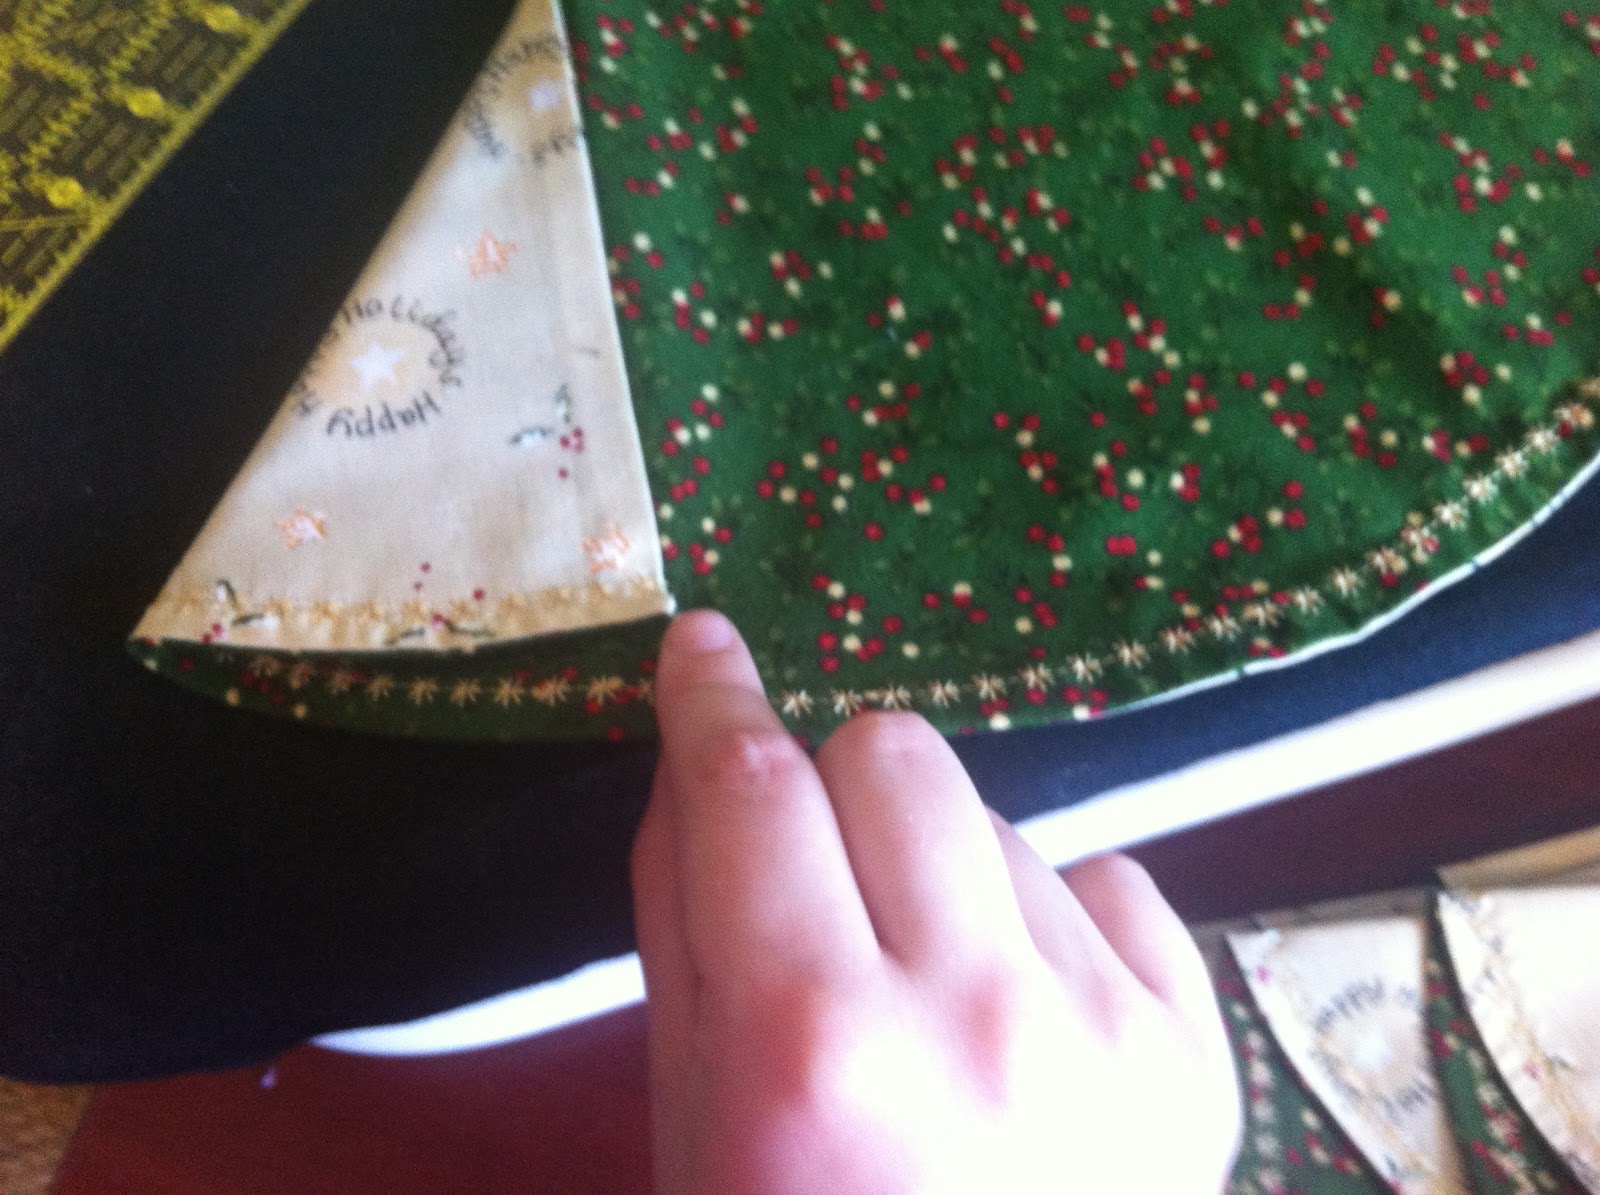
You are almost done! The best way is to just play around a little until you find the number of folds you like best. I have pictures of napkins showing a 4 fold and 6 fold trees. I personally like the 6 fold better but whatever you prefer! I fold mine now by trial and error but I know there are those of you who like specific directions. I found starting in one end with a 45degree triangle works well for a 6 fold tree. Just kind of follow along with the pictures.
At this point straighten it up a bit and adjust as needed to make sure no sides are sticking out funny and iron it all down!
Here is some with 4 folds They are done with a 30 degree angle.
Now if you really want to you can sew lines in a matching thread along the ironed lines so that when they are washed the recipient will know where to fold again.
That's it! Hopefully you all enjoyed this tutorial. Feel free to ask questions in the comments!!!
ALSO don't forget you can enter the Digital Scrapbooking Giveaway from My Memories in my previous post!! Just go to my previous post and follow the directions at the bottom of it- all you need to do is pick your favourite layout and put it in the comments. It is really fun and enjoyable and super easy to use!
Have a great day and Happy Stitching!!!
Kallie
Makes 6 Napkins
Materials:
1.5 meter front fabric
1.5 meter coordinating backing fabric
Matching thread for handsewing the opening and stitching the napkin
Contrasting thread for the "garland" detail or ric-rac/ribbon etc which ever you choose.
Template- Christmas Napkin Template
Template:
To make the template click on the link above and print 4 copies. Tape together. As stated on the template ignore the dips in the corners where the templates meet. You will be making a semi circle with you template.
Cutting
Using your template and your first fabric either trace around your template (remember to NOT trace the dips, just make a smooth semi-circle) and then cut the semi circle or just cut around. Whichever way you prefer. You will be cutting 6 semi circles.
Do the same thing with your second fabric.
***** If you have a directional print make sure to cut your semi circles with the flat bottom to the top. If you have your directional prints cut with the "tops" of say a bird pointing to the circular part f the napkin they will be upside down when folded.********
![]() |
| See how the directional print has been cut both ways? |
![]() |
| Now when we take directional print with the straight edge at the bottom it will end up upside down |
Sewing:
Now that you have 6 of each fabric cut out take one of each and layer them right sides together. Start sewing with your matching thread about 3-4 inches before the straight part ends and continue all the way around the curve and stop about 2" from your starting point. This leaves you an opening for turning right side out on the straight edge which makes it easy to sew closed later. Repeat 5 more times!
Clip the 2 corners and if you can trim your seam allowance on the curved edge just a bit. I didn't but its up to you :)
Turn right side out and poke out the corners into a nice point with a chop stick or something similar that won't go through your fabric. Start ironing your napkin making sure to push the seam out so you have a nice crisp edge. It will take a bit of fiddling so take your time and don't burn yourself!
Hand sew your opening closed with matching thread using your favourite stitch. Whip stitch works fairly well just try to take small stitches so that it is hard to see your thread.
Once you have all those stitched closed, (I promise it won't take a super long time! Just throw on a good show or cd and stitch away)we can start on the fun part!!
Sorry! No pictures here but pretty self explanatory!
Garland!
Thread your bobbin and machine with your contrasting thread. I used a gold coloured thread which matches my napkins since most of mine had gold accents in the fabric.
I set my machine to an astrik (*) stitch because it reminded me of snowflakes. Use whatever stitch you like on yours. Now you will be stitching ONLY THE CURVE! Do NOT stitch on the straight edge!!! It will look a little funny if you do. Take your time and you may need to stop and reposition slightly depending on your machine.
Once you get to the other end it worked best for me to chain sew the garland, so one I was at the other end of the curve I butted the next napkin (straight edge to straight edge and just kept sewing the garland. This way I was sure there was no threads being tangled at the back by stopping and starting again. Plus it make it quicker! Then just cut apart as you go. I might add a smidge of fray check to lock the stitching in place and prevent it from coming undone.
If you don't have decorative stitches on your machine don't despair!! Just find some coordinating ribbon or ric rac and sew it onto both sides of the napkins curve. Another option is something like bias tape on the curve. Just use your imaginations and you will find something to use :)
| You can kind of see the garland after the needle. and the pressed edge of the curve before it. |
| Here you can see the chain stitching of the napkins |
Folding
You are almost done! The best way is to just play around a little until you find the number of folds you like best. I have pictures of napkins showing a 4 fold and 6 fold trees. I personally like the 6 fold better but whatever you prefer! I fold mine now by trial and error but I know there are those of you who like specific directions. I found starting in one end with a 45degree triangle works well for a 6 fold tree. Just kind of follow along with the pictures.
At this point straighten it up a bit and adjust as needed to make sure no sides are sticking out funny and iron it all down!
Here is some with 4 folds They are done with a 30 degree angle.
Now if you really want to you can sew lines in a matching thread along the ironed lines so that when they are washed the recipient will know where to fold again.
That's it! Hopefully you all enjoyed this tutorial. Feel free to ask questions in the comments!!!
ALSO don't forget you can enter the Digital Scrapbooking Giveaway from My Memories in my previous post!! Just go to my previous post and follow the directions at the bottom of it- all you need to do is pick your favourite layout and put it in the comments. It is really fun and enjoyable and super easy to use!
Have a great day and Happy Stitching!!!
Kallie
Thursday, 26 July 2012
Christmas Gifts
Pin It Now!
Good Morning!
I though I would post some quick pictures of what I have been working on lately for Christmas in July :)
Christmas Napkins!
I will be posting a tutorial for this in the next week or so (hopefully! depends on how crazy work is :S)
I am doing up several sets of christmas napkins to give out as gifts and also a set for myself. I have been making sets of either 8 or 12 as those will work for most families :)
Omigosh!
Well I didn't win any ribbons at Stampede, although that might be due to putting it in the wrong category!! Ooopps! They did not explain the categories and in my ignorance I assumed since I had it quilted on a longarm I should have to enter it in the long arm category. Should have realized they meant custom long arm quilting and entered it into the machine piecing category. Oh well! Live and learn right?
But it was fantastic seeing it hung up there in the stampede hall along with so many other amazing quilts. And I can officially say I entered it into the 100th Calgary Stampede :)
They had the quilts super high up so no one could touch them. It also meant you could not see a large amount of detailing unfortunately.
I though I would post some quick pictures of what I have been working on lately for Christmas in July :)
Christmas Napkins!
I will be posting a tutorial for this in the next week or so (hopefully! depends on how crazy work is :S)
I am doing up several sets of christmas napkins to give out as gifts and also a set for myself. I have been making sets of either 8 or 12 as those will work for most families :)
| You can see my stack before it's "garland" was sewn :) |
![]() |
| I think I prefer it with the 3 tiers versus the 2, but it shows there is options! |
![]() |
| Random gratuitous picture of my cute kitty Nox who fell asleep beside me while I did some hand sewing |
Omigosh!
Well I didn't win any ribbons at Stampede, although that might be due to putting it in the wrong category!! Ooopps! They did not explain the categories and in my ignorance I assumed since I had it quilted on a longarm I should have to enter it in the long arm category. Should have realized they meant custom long arm quilting and entered it into the machine piecing category. Oh well! Live and learn right?
But it was fantastic seeing it hung up there in the stampede hall along with so many other amazing quilts. And I can officially say I entered it into the 100th Calgary Stampede :)
They had the quilts super high up so no one could touch them. It also meant you could not see a large amount of detailing unfortunately.
New Books!
So I have picked up some new books in the last couple weeks and figured I would share them with you :)
| This is an amazing book with some stunning piecing fun scrappy patterns http://www.laundrybasketquilts.com/Shop/shopindex.htm |
| Stunning english paper piecing that makes me want to finish my Japanese Flower Garden and start on itty bitty hexagons! http://www.connectingthreads.com/Books/Quilts_from_Grandmothers_Garden__D45654.HTML |
| This book has some incredible modern quilt patterns and I really suggest flipping through it! http://www.connectingthreads.com/books/Quilts_from_the_House_of_Tula_Pink__D45564.html |
| This is just to leave you with a lovely pic I took the other day on the way to quilting. Just look at those clouds! So pretty :) |
Hope you all have a wonderful day full of stitching!
Happy Stitching!
Kallie
Labels:
Christmas,
Flower Garden,
Hexies,
Omigosh
Subscribe to:
Posts (Atom)